


Taking care of nails is an area that many dog owners are a bit afraid of. It is one of those things that you just need to jump in and do and the more you do it, the better you will get at it. Depending on the dog, it can be a one or two person job. Sometimes it is easier to have another person with you to hold the dog or, if you are holding it as Mary Elizabeth is holding this Corgi in the photo above, sometimes it is helpful to have another person nearby to hold another paw out of the way of the dremel or distract a Corgi with some peanut butter on a spoon. Some people train their dogs to lay down or stand on the table as they are having their nails done. Try different ways and positions and see what works best for you and your Corgi. The Corgi in Mary Elizabeth's lap is very used to having her nails done. She is comfortable and relaxed. Because her nails were a bit on the long side, Mary Elizabeth used a clipper to trim a bit of nail off before using the dremel. See how she is holding the nail up and the angle at which she is holding the dremel in order to easily file down the nail. She will move the dremel slightly to keep her sanding neat and even and remove any jagged or rough edges, making the nail even and with a slight softening or rounding of the edges so there are no sharp bits of nail. Her front paws are finished, and Mary Elizabeth is working on her back paws now. You can see the fur that needs to be trimmed. We went outside for this photo but if you want to try this position inside, it is helpful to rest your back against a wall with good lighting near an outlet for your dremel, unless of course you are using a cordless dremel.
Most dogs that come from a good breeder and have been home-raised are very used to having their nails done as those little nails grow quite quickly and they start getting cut after a couple of weeks so they don't scratch up their mother while nursing. This does not mean they enjoy having their nails done, but they learn to tolerate it. When nails are done properly and carefully, there is no pain for the dog. It is like cutting your own nails or cutting your hair. You will want to familiarize yourself with the anatomy of your dog's nails. The pink part is called the quick. **
The more often you do your dog's nails, the further back the quick will recede, allowing you to get their nails shorter each time. If your dog's nails are clicking on the floor, they are probably a bit too long. Always take care of their nails in very good lighting, and I highly recommend wearing safety glasses to protect your eyes and perhaps even wearing a dust mask while using the dremel.
If your dog is freaked out by the dremel, you will need to start conditioning her and yourself so this routine that you will have to do for the rest of her life does not become a dreaded chore. Commit to a routine and a plan, start ever so slowly in baby steps with lots of treats. For the first day, just put your dog in whatever position you feel comfortable with to do her nails and just touch each paw, with the slight firmness you would use to expose each nail with your hand. Give her a treat and praise her. The next time, do it again, and then turn on the dremel but don't touch it to her paws. Treats and praise again. Do this for a couple of days so she equates the sound of the dremel with treats and praise. When you feel comfortable (you can do this!) just touch the dremel to the tip of one and only one nail. Treats and praise. The next day, go back to that first nail, touch it quickly again and then add the next nail. Do this every day, quickly and carefully sanding off a tiny sliver of nail and then give lots of treats and praise. Eventually you will build up the trust on her part and the confidence on your part to zip through all of the nails quickly and easily.
I want to warn you about the dremel. Whether you are using sanding bands or a sanding stone on the tip, before you use it on your dog's nails, quickly see what it feels like on your own. Our human nails are not as strong and thick as theirs, but you can feel how fast the grinding happens. You never ever want to overdo it or stay in one spot too long because the friction can burn and your dog will not forget it. Better safe than sorry. Be careful. Be firm but gentle. Hopefully your breeder has removed the 'dew claws' from your dog's paws. The dew claw (which would be a fifth claw up the side of the paw) should always be removed because if not, they can catch on things and cause real pain and bleeding. Should you have a dew claw, take special care to buff the edges smooth to try and avoid that scenario.
I have one dog who has had his nails done since he was a baby. He just does not like it. Never did, never will. He is a pip. Same one who never likes to take a bath. It takes a village to groom this dog. Seriously, Mary Elizabeth and I have to brace ourselves with a mocha frap from Starbucks before tackling his nails. If you have a dog that is like this, you may want to have a soft 'velcro' muzzle on hand just to keep him from trying to bite the dremel. You can try using something like rescue remedy or one of the natural flower essences( http://www.floweressencesforanimals.com/ ) before doing the nails (I like "Thunderstorms" for phobias flower essence for this purpose) and then Pet ETS (Emergency Trauma Solution), to re-set her sense of well being immediately after. Tell Nancy I sent you. She is an expert on flower essences and is very nice to speak with. She will point you in the right direction should you wish to give these a try. I personally highly recommend them for any dog that has issues such as this.
I have other dogs who will simply lay there with their head on my shoulder, and give me each paw as if they are in a spa getting a mani-pedi. Go figure. You can just do your best to try and train them and make them as calm and used to this as possible. It takes time, but it is so worth it. You will save money by not going to the vet or groomer every couple of weeks and you will be able to get their nails shorter and nicer looking because most vets and groomers just use a clipper and not a dremel for a polished look.
You will want to keep the paw fur trimmed. This is really the only scissoring that need be ever done on a Corgi. For this (as noted in my previous grooming post) I refer you to the photos in Debbie Harper's book. We want a nice, neat oval paw on a Corgi. Note the excess fur on the top left photo before fur and nail trimming. Note the nice neat underpad of the paw after trimming in the top right photo and the nice, correct oval shape in the bottom left photo. In the bottom right we can see the incorrect result of over scissoring and trying to trim in between each toe. You can even use a mini shaver to buzz off the fur at the bottom of the paw, taking care not to go up too far. Remember the old adage: measure twice, cut once. Well, there is really not much measuring going on here, but you know what I mean. And if you over-scissor while you are learning, don't worry. It is fur. It grows back. You may find it easier to trim some of the fur before you do their nails in order to get it out of your way. You may click on the photo to enlarge it if you like.

Keeping your Corgi's nails groomed is not only important to look spiffy, but it is important to her health as well. Overly long nails can affect the way they move and throw their gait out of wack and cause a 'splayed' out foot. Extremely neglected nails can curl under, be difficult and painful to train back. If you regularly leash walk your Corgi on concrete or sidewalks, she may have shorter nails than a Corgi who spends most of her time on the grass. So there's a little added bonus for walking your dog. You both get a little exercise and less time doing nails! With a little regular care, nails are really not a big deal to keep up with.
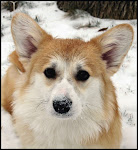
While we were outside at Mary Elizabeth's house taking this photo, curious Kaizey popped her head up in the window to see what was going on.

Then Emma decided to join Kaizey to see for herself what was going on out there.
 Both were happy to be observers rather than nail demonstrators that day.

.jpg)


8 comments:
This was a fantastic series and I'm glad all your lovely models are so willing to help teach.
I'm off to do the girls toes today and you are right, if they are clicking they should be done. I've been a bit behind in this and time to start keeping up!
I swear the nails grow as fast as my peas!
This really IS a helpful series you've been doing, and believe me, all the corgi mamas and papas are appreciating it! Love the pics.
Hope all is well in NY, and enjoy summer to the max!
I didn't realize the more the nails are trimmed, the quick recedes. Another good reason to keep your pup's nails trimmed, he can accidentally scratch you. This is an unusual incident, our "shorky" Bernie was playing with Rocky(our corgi) and actually scratched the cornea of Rocky's eye. I think of Rocky wasn't blind, he could of closed his eye in time. Bernie's nails are now trimmed.
Excellent! I especially liked seeing those pictures of the properly trimmed foot. We call the hair between the toes "cotton candy"! Time to trim the cotton candy. I used some of your combing techniques on our neighbor's cat. We are watching him all week and he had some patches on his back that hadn't shed and were matted down. I picked and teased them out gently and he feels much better now!
I Corgi lovers around the world have enjoyed your series on caring for the breed. This nail thing is a real issue for my daughter's dog--half Boston Terrier and half Chichuachua. We're all afraid of clipping them--but I have gotten her pinned down and gone after them a time or two....when she starts making that "clicking" sound you described. I didn't know about the Dremel--we just have the old standard clippers. In fact, I have her for the day---I think I should at least clip ONE, don't you? Maybe by the time she leaves, I'll have clipped every stinking one of her little nails!! I know she'll thank YOU for the nudge!
Hope you're having a happy summer. Dana
Thanks for another wonderful tutorial! I too am one of those owners who dread cutting their corgis' nails, but we soon discovered that he grinds his nails down as we walk him on paved roads every day. But I agree that it's one of those skills that we should have learned, just in case ;)
I loved this whole series about grooming. I do all my own grooming on my two corgis and find the tips helpful. I do many of the steps in about the same way you do but have never learned how to line comb and i appreciate the tips. Also I loved to see the properly groomed corgi foot.. i do clip the toe pad hairs as well and find that my two nearly fall asleep during the foot portion of their grooming session... they dont love the dremmel but they dont hate it as much as clippers.
Thanks for doing this series.
Emilie
That looks like how I need to hold Amy when I do her nails. Face squished in to my stomach and one leg in between her back legs to prevent the kicky-punchies. So glad I'm not the only one.
Sigh. I can hear the clickety clack. Someone ought to get their nails did....
I've managed to reread all your corgi grooming columns this afternoon! Very inspiring!
Post a Comment